How To Encrypt Computer Files

In 2024 we can no longer trust companies to protect our data. We must take privacy into our own hands. Today I will show you how to encrypt your files on a Linux terminal but you may also do this using your MacOS terminal (sorry Windows lovers).
Yes, GnuPG (GNU Privacy Guard) can be used in the macOS Terminal, just as it can be used in the Linux terminal. GnuPG is cross-platform and is available for macOS along with other operating systems.
Lets briefly talk about what it does.
GnuPG (GNU Privacy Guard) is a free and open-source implementation of the OpenPGP (Pretty Good Privacy) standard, used for encrypting and digitally signing data. It provides cryptographic privacy and authentication for data communication, allowing users to securely exchange sensitive information over the internet.
Lets begin.
Download GnuPG
Start by typing this command into your terminal
sudo apt-get install gnupg
Once download is complete, get started with gpg using this terminal command:
gpg — full-gen-key
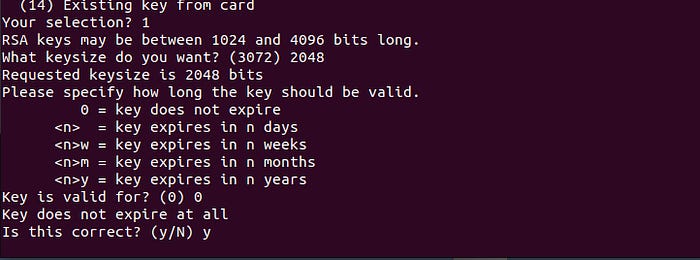
Select option 1 as you can see it is the default option:
‘RSA and RSA (default)’

Lets take a brief moment and read some information on the different types of algorithms applicable.
In GnuPG (GPG), the RSA option is used to specify the RSA algorithm for encryption, decryption, or key generation. RSA (Rivest-Shamir-Adleman) is a widely-used asymmetric cryptographic algorithm for secure data transmission.
DSA (Digital Signature Algorithm):
DSA is primarily used for digital signatures. It is an asymmetric cryptographic algorithm that allows a user to digitally sign data using their private key, and others can verify the signature using the corresponding public key. DSA keys are typically used for signing data rather than encrypting it.
ElGamal (Taher ElGamal 1985):
ElGamal is another asymmetric cryptographic algorithm used for encryption and digital signatures. In GPG, ElGamal is primarily used for encryption, particularly in the context of encrypting data for multiple recipients.
You have the option to select a key between 1024 and 4096 bits long. In summation, the more bits, the more complex the key. Higher bits will also take longer to create. Below is more information regarding bits.
Shorter Key Lengths (e.g., 1024 bits):
Longer Key Lengths (e.g., 2048 or 4096 bits):
Shorter key lengths provide faster encryption and decryption operations.
However, shorter key lengths are more susceptible to brute-force attacks, where an attacker tries every possible key until finding the correct one.
With advances in computational power and algorithms, shorter key lengths are becoming increasingly vulnerable to attacks.

After your bits selection you will be prompted to select an expiration date for your key. For now lets select 0, in which your key will not expire.

Next you will be prompted to type in an Email, a Name, and Comment if necessary. The email is only used as an identifier. This will not engage your email address or send anything to you.

You will then be asked to create a passphrase. In order to unlock your file you will be prompted to type in this passphrase so keep that in mind!
After the passphrase is created you will see some basic information about the key creation.
Next, select a file to encrypt by typing this in your terminal:
gpg -r insertemail@xyz.com -e ‘your_file_name’
Remember to use your own email address and file name, again, the email is only used as an identifier. This will not engage your email address. Be sure to use the same email here that you set up with.
“-r” : This specifies the recipient’s public key to encrypt the file.
“-e”: This option tells GPG to encrypt the file specified next.
Once you run that command you will see a new file created that ends in ‘.gpg’
At this point you’ve successfully encrypted your file! Now to decrypt it, follow the commands below.
Decrypting the File
In your terminal type in: gpg -d ‘filename.gpg’
You will be prompted to type in the passphrase.
When you’d like to delete a file, don’t archive or delete it… Shred it
The Shred Command
The `shred` command in Linux is used to securely delete files by overwriting their contents multiple times before deleting them. This command is primarily used when you want to ensure that the data in a file cannot be easily recovered, even with specialized data recovery tools.
By default, `shred` overwrites the file three times, but you can specify the number of times it should overwrite the data using the `-n` option.
Here is the basic syntax of the ‘shred’ command
shred [options] ‘your_file’
Some common options for shred include:
-n, — iterations=N: Specify the number of iterations (overwrites) to perform.
-z, — zero: Add a final overwrite with zeros to hide shredding.
-u, — remove: Truncate and remove file after overwriting.
-v, — verbose: Show progress information.
For example, to securely delete a file named `example.txt` using `shred` with 5 iterations, you would use the following command:
shred -n 5 example.txt

Above is what will display when you try to open the file after deletion.
I hope you implement this tool into your daily operational security procedures! How frustrating it would be for a hacker to work his/her way into your computer and find everything encrypted!
HA!
Stay Vigilant,
